You reached the limit of pages to see for today

Author Topic: Shoebox seam separation  (Read 334 times)

April 20, 2021, 12:12:54 PM
Read 334 times

CouchDog

  • Information Offline
  • NorthEast
  • Posts: 5
Shoebox seam separation
« on: April 20, 2021, 12:12:54 PM »
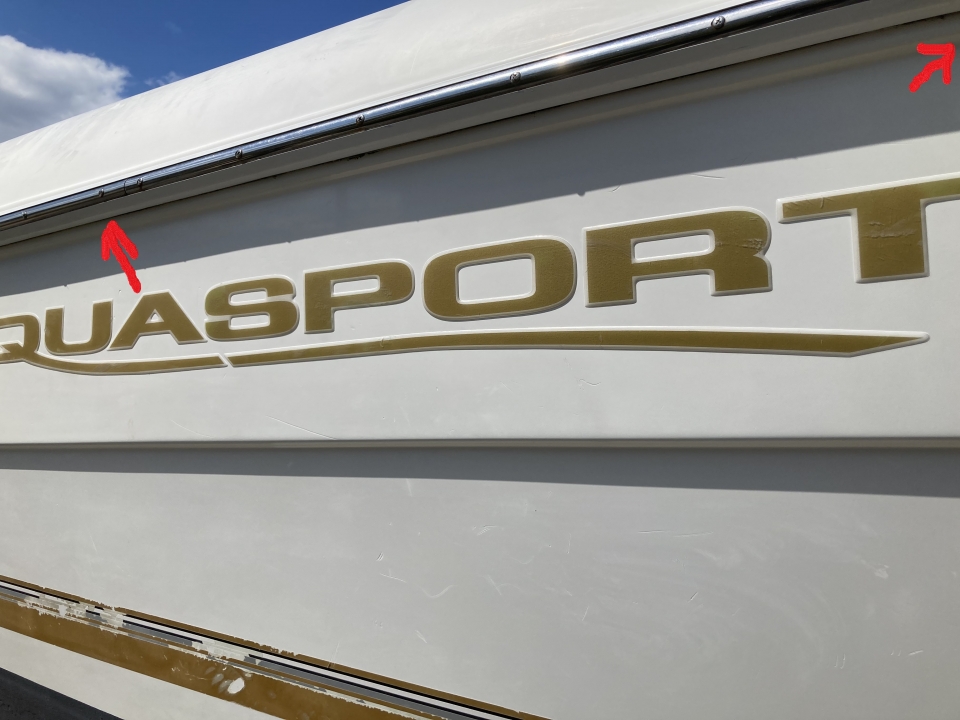
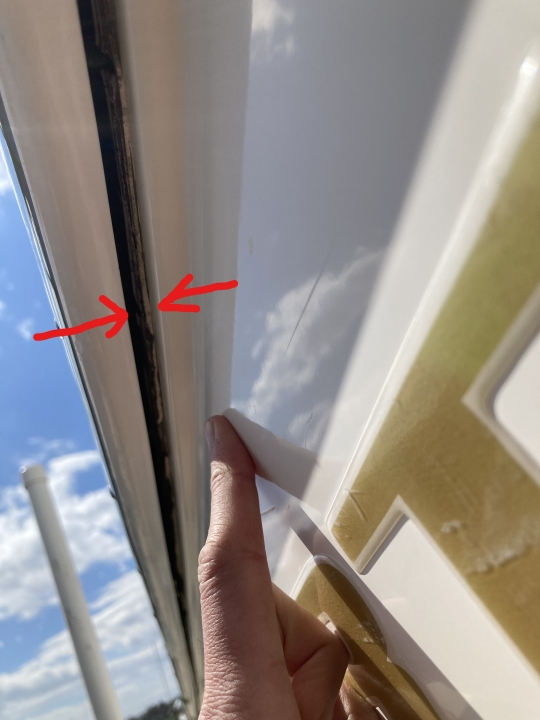
Hi All- so I picked up an '01 205 Osprey and there is a ~5foot section on the aft starboard side where the hull is separated from the rub rail/ deck cap.  If I apply light pressure to the hull around the 'aquasport' lettering, a gap of about 0.5-0.75" opens up and I can see daylight if I look through the gunwhale rod holder holes on the inside.  First question is how are the upper and lower molds originally connected?  Are they sealed + screwed/riveted (I think so?) or is it glassed after assembly?  Second question, has anyone had an issue like this and how did you correct it? 
I am thinking that I will
1) Remove the rub rail for that section
2) Fill existing screw holes on the hull side of the seam with something like 5200 since I am guessing the screws pulled through the fiberglass there
3) Use thickened epoxy (six10?) in the seam between the hull and the deck
4) Re-Screw or rivet the seam
5) Caulk the seam??
6) Re-install rub rail

Am I way of base? Will this be ok structurally?  Should I use something besides 5200 or six10?  Are screws or rivets better to use?  They will all be blind rivets- is there a trick to getting them to hold better/ not pull through again?

This is the section of the boat where it is separated:

This is what the gap looks like when I apply light pressure.  Its about 3/4" with a couple pounds of pressure

Thanks in advance
-CD
'01 205 Osprey w/ 2016 Honda BF150

April 20, 2021, 03:23:46 PM
Reply #1

RickK

  • *****
  • Information Offline
  • Administrator
  • Posts: 11277
Re: Shoebox seam separation
« Reply #1 on: April 20, 2021, 03:23:46 PM »
I would say someone didn't put screws through the joint into the top of the hull side or maybe that is how they started to make them in the newer years - just use adhesive? They used to have a 3/4 or 1" strip of wood along the top of the hull side that they screwed into from the outside. I would remove the center of the rub rail and look to see if you can find any screws anywhere. Maybe gently pry the rub rail away enough to look for screws?
Rick
1971 "170" with 115 Johnson (It's usable but not 100% finished)

1992 230 Explorer with 250 Yamaha

April 20, 2021, 03:29:36 PM
Reply #2

CouchDog

  • Information Offline
  • NorthEast
  • Posts: 5
Re: Shoebox seam separation
« Reply #2 on: April 20, 2021, 03:29:36 PM »
Ill take a look next time I get down to the yard to take a look at the boat- probably over the weekend.  So you think there was a period where it was only assembled with adhesive?  Do you know what adhesive was used?
'01 205 Osprey w/ 2016 Honda BF150

April 20, 2021, 07:30:09 PM
Reply #3

RickK

  • *****
  • Information Offline
  • Administrator
  • Posts: 11277
Re: Shoebox seam separation
« Reply #3 on: April 20, 2021, 07:30:09 PM »
No clue but I'm sure that a member will pop up and share some knowledge
Rick
1971 "170" with 115 Johnson (It's usable but not 100% finished)

1992 230 Explorer with 250 Yamaha

April 20, 2021, 07:56:05 PM
Reply #4

mshugg

  • Information Offline
  • Master Rebuilder
  • Posts: 951
Re: Shoebox seam separation
« Reply #4 on: April 20, 2021, 07:56:05 PM »
It’s probably OCD, but I wouldn’t be happy until Ipulled the rubrail off and gave it athourough inspection.  There’s always a chance it was a Friday boat. The hull deck seam is subject to a lot of stress.  Screws can and do pull out or wear out their holes.

 Most people add screws in fresh glass and replace adhesive. You want something flexible like 5200, but methyl Methacrylate is better, though it costs more and requires a special caulk gun.  The Methacrylate still flexes, but not as much as 5200, plus it requires less surface prep.  You don’t want to use poly or epoxy, because they’re to brittle for this application.

By the way, don’t use 5200 to rebed your rub rail. UV 4000 is better for the rubrail, and will allow you to remove rubrail in the future.

April 21, 2021, 09:41:56 AM
Reply #5

CouchDog

  • Information Offline
  • NorthEast
  • Posts: 5
Re: Shoebox seam separation
« Reply #5 on: April 21, 2021, 09:41:56 AM »
Thanks mshugg- that is good info.  I see what you mean about mma adhesive and the special dual cartridge caulk gun.  Not getting a ton of results for specific products but think I found a few available near me.  SikaFast 3551 or PlexusMA300...on the right track with those?

I'm going to try to take a half day Friday to be able to pull the rub rail and take a look and get materials to fix Saturday.
'01 205 Osprey w/ 2016 Honda BF150


SimplePortal 2.3.5 © 2008-2012, SimplePortal