This article is helpful in the installation of hatches in cored decks (which is the case on my 1987 22-2). Here's the link:
http://www.yachtsurvey.com/DeckLeaks.htmAlso tried to copy the article with picutre- hope it works. Good luck.
Hatches The second most common offender is improperly installed hatches which, just like improperly installed stanchions, are extremely difficult to correct. Most often the causes are as follows:
(1) There is not enough framing in the deck so that the deck sags somewhat, making it impossible for any caulking under the hatch frame to seal. In this case, you can remove the hatch frame, recaulk it, only to have it start leaking again. The only solution for this is to drop the headliner (if possible) and add frames around the hatch opening to strengthen it against deck deflection.
(2) While the deck may be strong enough, the hatch opening may be improperly designed. If all the builder did was to cut a hole in the cored deck (as many do) and simply screw the hatch frame in place, then that is the source of your problem. Whatever small about of deflection there is in that deck is going to break the screws and caulking loose. Check the screws: if they're loose and won't tighten up, then that's the problem.
Remove the frame and check if the hatch is screwed into the core. Chances are it is, and if that's the case then it can be fixed fairly easily. Here's the method I used for repairing a foredeck which had no frames whatever, and a hatch that was installed through the core.
My deck was very weak, so what I did was to cut two fir frames and heavily glassed them to the underside of the deck, one forward and one immediately aft of the hatch. Since the headliner was glued to the underside, I opted to replace it with new white vinyl and contact cement. Took 3 hours with 2 people.
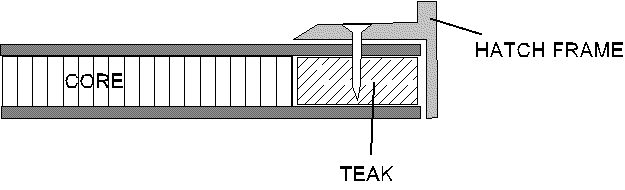
The basic idea here is to remove the core (balsa or foam) and replace it with a wood frame as show in the above illustration. In my case it was balsa and I cut it all out 2-1/2" around the perimeter of the hatch, mainly by just digging it out from between the glass laminates. Then I smoothed off the rough inside laminate surfaces with a sanding disc. Next, cut a teak framework to fit the perimeter of the hatch, making the frames about 1/16" less than the distance between the void space that you have created by digging out the core. If the deck is slightly curved, you need to shape the teak strips accordingly by planing them to the proper contour. This is likely to be only a few degrees of arc and won't be difficult, but if you fail to do this, it will distort the deck!
Next, fit the pieces between the laminates, set the hatch frame in place and drill new bolt holes to size of the new bolts (instead of screws) that you're going to use. If the headliner is glue to the deck underside, you should bolt right through the liner, or be prepared to install moldings to cover up the bolts. After all the new holes are drilled, you next load the void up with epoxy, fit the teak frames into the void, caulk the underside of the frame, and then bolt the whole mess together while its still wet. Make sure that the edges around the new framework are completely sealed off with the epoxy, as well as the surface of the exposed teak.
Before putting it all together, perform a dry fit to make sure that when you bolt the frame down that it does not distort the frame when the bolts are tightened. It should merely squeeze it altogether, not cause any distortions in the deck. If you did the job right, I guarantee you this hatch will never leak again. This part of the job took about 8 hours.
Deteriorated Deck Cores Sometimes these are repairable, sometimes not depending on where the problem is and what has to be cut out to make the repairs. If you have, or suspect you have, water in a deck core, the way to tell is to simply drill a couple of small holes in the underside and see if water runs out.
The best way to repair deck cores is from the underside when that is possible. Making repairs is easy, but putting back together everything that has had to be torn out is where the real work comes in. The problem with repairing from the exterior is that it is extremely difficult to accomplish a finish repair that doesn't look like its been repaired, and its not a job for an amateur. If you can't make the repair from the underside, you should not try an exterior repair yourself unless you are highly skilled in this sort of thing. Few people are. If you can't get access from the underside, then you have a major and costly problem on your hands.